 CARVING REALISTIC SNAKESCARVING REALISTIC SNAKES
His snakes receive more attention than any other kind of carving in his repertoire. Nearly every time that he got into a discussion regarding his snake carvings he was asked if he began with vine wrapped wood. He did not. Many carvers do this and I have seen some very attractive pieces but they have all been abstract rather than realistic. I believe realism requires a deliberate pattern on the wood rather than the dictates of a vine wrapped branch .
 He would
develop his pattern from photographs and sketches available in
reptile field manuals. The Audubon Society Field Guide to North
American Reptiles and Amphibians, Alfred A. Knopf, New York, is
an excellent source. In the introductory chapter there are several
detailed drawings of head and body scale patterns and in the color
plates there are many ideas for attractive varieties of snakes.
Although some artistic liberty may be taken in size and proportions,
there are certain basics which must be followed closely. For example,
the shape of the head is quite different from species to species.
He would
develop his pattern from photographs and sketches available in
reptile field manuals. The Audubon Society Field Guide to North
American Reptiles and Amphibians, Alfred A. Knopf, New York, is
an excellent source. In the introductory chapter there are several
detailed drawings of head and body scale patterns and in the color
plates there are many ideas for attractive varieties of snakes.
Although some artistic liberty may be taken in size and proportions,
there are certain basics which must be followed closely. For example,
the shape of the head is quite different from species to species.
The stock of choice is a softwood log of diameter twice the maximum thickness of the intended snake plus the thickness of the supporting shaft. He seldom worked with anything less than 4 inches in diameter and he prefered yellow poplar because it would result in a hardness that would stand up to a bit more abuse than something like linden or pine. If the log is not thoroughly cured or dried, one can usually avoid checking by sealing it in a plastic bag between carving sessions.
In the layout procedure he would try to avoid imperfections in the wood occurring in the body of the snake and make the pattern somewhat wider than he wanted the finished snake to be. Rounding the snake and under-cutting made that excess wood disappear rather quickly.
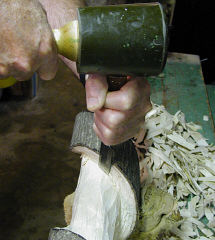
ROUGHING OUT:
He thought of this step as "carving the shaft"
and leaving behind enough wood from which the snake may be carved later. This is accomplished
by going back and forth from end to end along the pattern of the
snake  making a series of
stop cuts and removal cuts (shown below) to remove about a quarter-inch
depth on each pass. The process amounts to peeling the log (except
for the snake) as one would peel the layers off an onion. Eventually
he would have removed all wood that isn't either snake or shaft.
making a series of
stop cuts and removal cuts (shown below) to remove about a quarter-inch
depth on each pass. The process amounts to peeling the log (except
for the snake) as one would peel the layers off an onion. Eventually
he would have removed all wood that isn't either snake or shaft.
A word of caution for those who wish to try this; all stop cuts must be made so as to keep the sides of the snake parallel. A variation from this will change the size of the pattern as you go deeper or, worse, result in a "V" cross-section and insufficient wood from which to carve the snake. Also, in making stop cuts the alignment of the firmer will vary from across-grain to along grain. Blows from the mallet must be adjusted accordingly or they may result in stop cuts that are too deep or perhaps start checks in the shaft.
|
|
 |
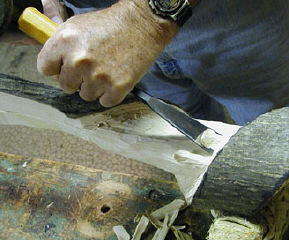 |
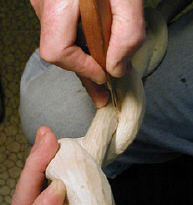
SHAPING AND ROUNDING THE SNAKE:
Shaping begins by removing the excess wood at the head and tail. The snake is tapered from just below the first turn so as to leave about three quarters of an inch depth over the head and first few inches of straight stock. Then the process is repeated beginning about one-quarter the length of the snake from the tip of the tail and creating a gentle taper to only an eighth inch depth at the tip (or a taper to terminate in a rattle). The body of the snake is then rounded using a suitable gouge.
|
|
|
 |
 |
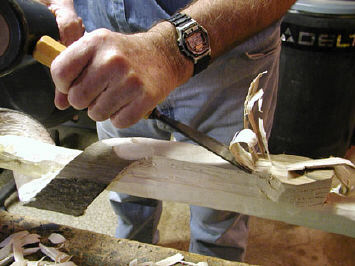
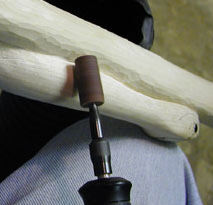
After the rough rounding is complete the gouge marks may be removed using a variety of tools including knives, Surform tools, power rasps, and a belt sander.
Finally, the head is shaped, the body of the snake is undercut, and the entire snake is finish sanded. The undercutting is a key step to realism and if done correctly the snake will appear to be a separate piece of wood from the shaft.
|
|
|
 |
|
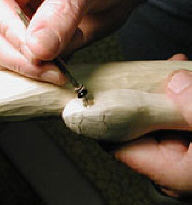
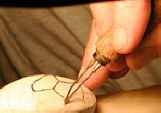
DETAILING:
Detailing begins with the head of the snake. With reference to a suitable head diagram, the eyes are set in and the head plates and scales are sketched in place.
|
|
|
|
|
The head plates and mouth line are then burned in and rounded with a detailing knife.
|
|
|
 |
 |
|
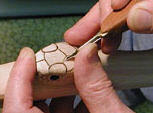
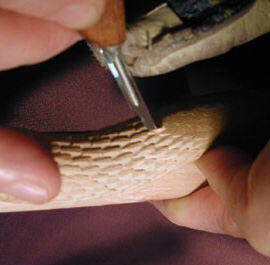
To achieve realism, each individual scale receives a minimum of five cuts. First the shape of the scale is pressed in using a Speedball No. 3 V-shaped wide cutter. |

|
 |
This is followed by making a stop cut on both sides of the scale. |
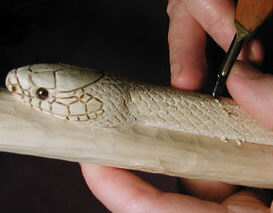
| The final cuts depend upon the scale type for the snake in progress. For a smooth scaled snake, such as this king snake, each side of the scale receives a shallow undercut. |
 |
|
For keeled scales, as in this water snake, cuts are made from the centerline toward the outside edge to give a ridge, or keel, down the center of each scale. Recently, a fellow woodcarver , Bob Lehr, suggested pressing in the keels with a hot knife at a very low temperature. He experimented with this technique and was quite pleased with the realism that results. In all cases, the pattern of scales is ordered as one would order bricks in laying up a brick wall.
|
 |
When the scale detailing is complete he went over the entire shaft with a knife to remove all tool marks and give a uniform whittled surface texture.
STAINING AND VARNISHING:
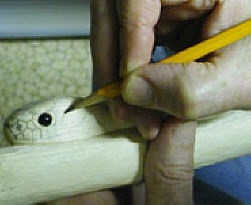
 Again,
photographs from reptile field manuals provide a color and pattern
guide for staining or painting. The markings, here on a copperhead,
are first sketched in with pencil.
Again,
photographs from reptile field manuals provide a color and pattern
guide for staining or painting. The markings, here on a copperhead,
are first sketched in with pencil. 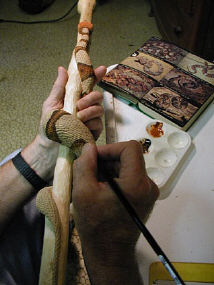 Penetrating
oil stains, India ink, and acrylic paints are then used in various
combinations as necessary. Finally, each piece is given at least
two coats of a flat varnish before burnishing in a paste wax with
0000 steel wool.
Penetrating
oil stains, India ink, and acrylic paints are then used in various
combinations as necessary. Finally, each piece is given at least
two coats of a flat varnish before burnishing in a paste wax with
0000 steel wool.
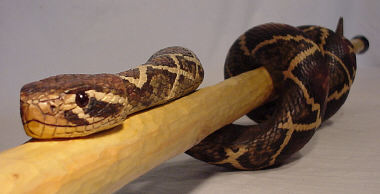
 One interesting variation involves the snake head
perched on top of the shaft with the snake coiled close to the
top of the stick such as in Water Moccasin VI, carved in yellow
poplar (1999) shown on the left. One interesting variation involves the snake head
perched on top of the shaft with the snake coiled close to the
top of the stick such as in Water Moccasin VI, carved in yellow
poplar (1999) shown on the left. |
The artist frequently used a side branch to create the hanging head pattern such as in Copperhead XVII, carved in yellow poplar (2001) and shown on the right. For this pattern it is necessary to obtain a diagram for the scales occurring on the underside of the head. |
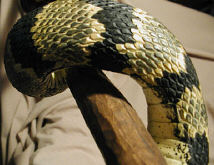
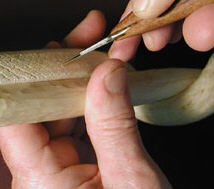
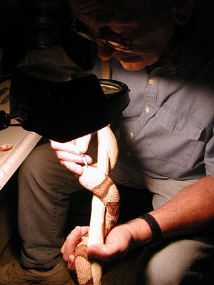
 This
sort of detailing is illustrated below where the sublabials and
belly scales have been carved on a water snake in progress. This
sort of detailing is illustrated below where the sublabials and
belly scales have been carved on a water snake in progress. |
Another interesting pattern is one in which one or several coils rise up off the shaft so as to expose belly scales. This is illustrated in Timber Rattlesnake XI, carved in yellow poplar (2001). |